
A little advice for trick or treaters....
Sunday, October 31, 2010
Wednesday, September 29, 2010
Watch out! A dragon is coming....


Tuesday, August 10, 2010
Muffikins
Here is a small puppet I made for the Yellow House project I've been working on. This is Muffikins and she belongs to the artist Mary Cassatt.
I'll have some pics of the whole cast of characters next week after the filming. Stay tuned.


I'll have some pics of the whole cast of characters next week after the filming. Stay tuned.


Monday, August 2, 2010
Ruega por nosotros
This is a painting I did last summer for my grandmother. It was scanned in pieces so some parts look uneven. The text is the last few lines from the Ave Maria prayer in Spanish:
Santa María, Madre de Dios, ruega por nosotros, pecadores, ahora y en la hora de nuestra muerte. Amén.

Santa María, Madre de Dios, ruega por nosotros, pecadores, ahora y en la hora de nuestra muerte. Amén.

Tuesday, July 27, 2010
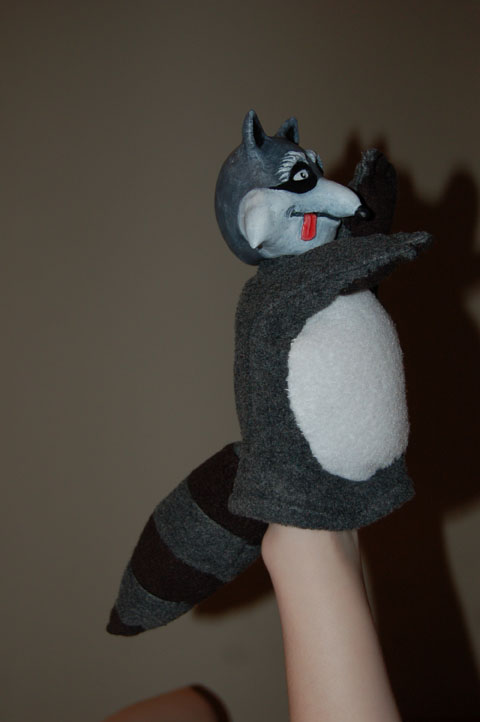
Raccoon Finished

I'm finally going to finish this post. I've done quite a few things since this raccoon but I wanted to finish this up here before I blog about something else. Sooooo......
The next thing to do is make the body. The body is cut out of fleece using a pre established pattern. Parts of the pattern, like the hands, were altered for this puppet to make it different from the last. After having had some new experiences with puppet making since this project, I would definitely recommend using faux furs, feathers, or crepe wool when creating small animal puppets. The fur really brings them to life. The anti pill fleece is good because it can stretch to accomadate the hand and it's cheap but it loses that extra effect.

After the two pieces were sewn together, the fabric is turned right side out. I use an embroidery needle to aid in the turning. These needles are much stronger than normal needles and won't bend easily.

The features are ladder stitched to the surface and stuffed with poly fill. Be careful with your stitches otherwise the material will bunch and pull.
 The tail is created out of pieces of fleece sewn together, and then the pattern is cut from that.
And here's the finished raccoon! Obviously I painted the head somewhere along the way. I used acrylic paints and then sealed it with modge podge hard coat.


Sunday, June 13, 2010
Raccoon Puppet - Step 1
The following blog posts will follow the development of a simple hand/glove puppet. The first step in making a puppet is designing it. Here are a few concept sketches for my puppet.


It's important to try and draw the puppet from multiple angles so you can more accurately sculpt the puppet later.

For this puppet I am starting with sculpting the head. In order to do this I take a styrofoam ball and bore out a hole for my finger. I then begin shaving the ball so that it starts to resemble the appropriate head shape. I used the blade of a pair of scissors as my tool for this part.


The next step is to begin the clay sculpting process. First I coat the whole styrofoam ball with clay (paper clay brand clay product). Then I start building up the major forms.


During this portion it's great to have those initial multi angle concept drawings I created to reference.


Almost done. Just have to sand him down and add some details around the eyes.
Thursday, May 27, 2010
Something a little different
Over the past few months I've been teaching a class on puppetry to middle school students. During this class I wanted to teach some of the students how to make hand/glove puppets. One would think these would be super simple considering the stuff I've been doing recently but it wasn't quite so. Hand puppets have their own nuances and their own type of locomotion. Also, the type of hand puppet I made requires sculpting skills as well. Luckily, my wonderful wife was on hand to give me a crash course. Using a styrofoam ball as an armature, I built up my sculpture using paper clay. The ball had a good sized hole cut in it so that the finger of the glove (or neck) could be stuck to it. I'll do another post at some point documenting the next hand puppet I make so I can show the process visually.
Anywho, here is the little guy I came up with. His name is Fuzzbucket. You may have seen a pic of him in an earlier post of a pen and ink drawing I did. Hopefully this won't be the last you see of him. In fact, it may be just the beginning :)
 As I mentioned earlier, his head is made out of a styrofoam ball with clay sculpted on top of it. The hair is part of a fuzzy boa and the body is hand and machine sewn using anti pil fleece.

Next time I'll show some video of how these type of puppets move.
Anywho, here is the little guy I came up with. His name is Fuzzbucket. You may have seen a pic of him in an earlier post of a pen and ink drawing I did. Hopefully this won't be the last you see of him. In fact, it may be just the beginning :)
 As I mentioned earlier, his head is made out of a styrofoam ball with clay sculpted on top of it. The hair is part of a fuzzy boa and the body is hand and machine sewn using anti pil fleece.
Next time I'll show some video of how these type of puppets move.
Tuesday, March 16, 2010

Gustav... continued
I've finished Gustav's head and body. The most innovative thing I did with this puppet was his eyes. I used painted and glazed styrofoam balls for his eyes and bore holes in them to insert the glass eye pupils. Air dry clay was used to fill in any imperfections. To cover the seam of where the foam meets the head I used a strip of terry to line the edge of the eye and sewed it the head.

The next obstacle is his clothing. Here is a concept pic of where I'm going with it. The coat will be made out of a dark gray felt and his sleeve out of lighter gray flannel material.


The next obstacle is his clothing. Here is a concept pic of where I'm going with it. The coat will be made out of a dark gray felt and his sleeve out of lighter gray flannel material.

Monday, March 1, 2010
Gustav in the works
I've recently been working on a puppet of Gustav Courbet. Gustav was the first puppet I ever made and I wanted to remake him using my new improved puppet know-how. I'm trying to still keep the same silly feeling but upgrade the materials and quality at the same time. As you can see he is not finished. I will post a pic of the old one compared with the new one when I'm finished.


Monday, February 1, 2010
New Project
My team and I recently won a grant from VCU to work on a new puppet project. The project will involve puppets telling the stories of famous (and not so famous) artists. Check out a few of the pics below to see the first two puppets in action!
This semester is going to be very exciting! Stay tuned for updates.


This semester is going to be very exciting! Stay tuned for updates.


Subscribe to:
Posts (Atom)