Thursday, October 29, 2009

Happy Halloween!

Over the past few days I've been working on a Jack-o-lantern puppet. I got a foam puppet from the craft store and designed a face....


Here's the first sketch.


Sketch transferred to pumpkin.


Tools used to transfer and carve.


Carved pumpkin.... oooo scary.


Lit carved pumpkin... spooky dooky!


Pumpkin jaw disassembled. Foam palette sized for mouth. LED tea lights used for lighting system.

Palette in progress. Grips are shown. Other side covered with cream yellow terry cloth to match inside of pumpkin.

Palette and light installed.


Light system tested.

Finished puppet. Black sleeve added to cover arm. Check out the movie to see it in action. Happy Halloween folks!

Thursday, September 17, 2009

Gadsden vs. the Capitol

Another pic of Gadsden in action I found on the internet. It looks like Gadsden is going to eat the Capitol.

Sunday, September 13, 2009

Gadsden says: DON'T TREAD ON ME

For the past few weeks I've been busy cooking up a new puppet creation. After receiving a suggestion from a friend of mine and reading about Bread and Puppet theater and the political messages of their puppets, I was inspired to create a puppet that would mix it up in the political arena. The message was simple: DON'T TREAD ON ME. So what better to convey this message than the rattlesnake from the Gadsden flag?

I did a few sketches based on the flag and then began on the armature.

Here's the head, a foam sculpture made with high density foam and contact cement.And here's the body. There is a tube of insulation foam connecting the many pieces of the body. I found that studying the actual anatomy of a snake went a long way in developing my foam armature.

And here is Gadsden! Unfortunately I was so busy I forgot to take more pictures of the process. I used taxidermy snake eyes for the eyes, antipill fleece for the skin, a plastic placemat for the tongue and model magic for the teeth.

And special thanks goes out to my darling little Objectivist Karly. She made the word banner on Gadsden.
Gadsden in action. The tail was made out of gatorade bottles filled with popcorn kernels. They produced a pretty good rattling sound. The crowd really loved the rattle. I believe I heard quite a few "Shake it baby"s as we walked by. This may have made Karly feel a bit uncomfortable since she controlled the tail.
And after a day of striking cuddly fear into the hearts of young children and small dogs, Gadsden and I settle down near the pool for a break. Check out the shirt on the guy behind me. It gives 3 wolf moon a run for its money.

Thursday, September 3, 2009

Wedding bells are ringing.... loudly

Here is the front cover to my wedding invitation I created. Ink, ink wash, and water color. I used a brush and some microns for the line work.

Wednesday, July 22, 2009

AHHHHH! Ice Cream Trolls!

I haven't blogged in a while since I've been quite busy with teaching. Over the summer I created an acrylic piece to use with the class I was teaching. I developed it as a way to illustrate my process to my students. The one thing I forgot was how LONG acrylic paintings take me to finish.

The subjects of this piece were common household ice cream trolls. The task I gave my students was to create a painting retelling an event in their life as a metaphor. For my example I did the same. The ice cream trolls represent a certain phenomenon that occurs in my apartment. Somebody (who will remain nameless) likes to go downstairs at night and gobble up the ice cream. This person does this discreetly enough not to alert the other person that lives here of their presence. When confronted about the disappearance of large amounts of ice cream, this person is quick to suggest the possibility of an ice cream troll infestation.


And here is an ice cream troll. Fat from eating all the ice cream. Feet like snow shoes to traverse the soft creamy landscape. Hands like scoops for effective ice cream consumption. And long tongues to lick large amounts of ice cream at a time. They also have cork screw tails; it is unknown as to why these tails are shaped this way and what purpose they may serve. It has been suggested that ice cream trolls may also drink wine....


Here is the rough sketch of my illustration. Bic pen and colored pencil.


Photo reference used for the composition.


Pencil sketch on illustration board done prior to beginning painting.


First step of painting process. Basic acrylic wash is applied to major color areas.


Next step of process- filling in the base colors. From here it's a lot of hard work, patience, and coffee. Developing the blending, details, and rendering takes a lot of time.


and a lot of paint.


And several days later we are done! Yay. From start to finish it took roughly 20 hours.... maybe more. I NEED to get faster. Any suggestions?

Tuesday, June 30, 2009

Lost in the woods....

This project pretty much has been lost in the woods for quite a while. I have been working on this TOP SECRET children's book project for a while (started summer 2004) and I thought I would share a snippet of some new beginnings. This is a scene where the main character becomes lost in the woods. I actually did this during last semester as the heavy work load of graduate school gnawed away at my sanity and confidence. But out of that stressful time came this piece and a renewed interest in this story. I basically rewrote the entire thing in rhyming verse and tried to rework the characters and give them a little more depth.

Here it is and hopefully I will have more to share soon. This piece was done using ink and ink wash on watercolor paper. My goal is to get a submission package ready by the end of next summer. Fingers crossed.

Monday, June 22, 2009

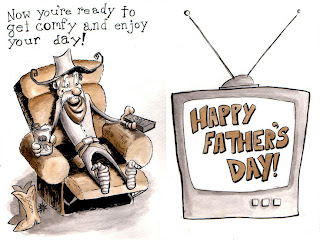
Happy Father's Day

Wishing all you fathers out there a happy (belated) Father's Day. Being a father is probably the most important role a man can have and I was blessed with a dad that really understood that. So for my great dad I created a homemade card using his favorite genre- the western.

I feel like this may have been a bit of a break through piece for me in that I experimented with a very limited color palette and some new inking techniques. I was trying to evoke that sepia-toned western atmosphere. The card was created on cold press watercolor paper using higgins black magic ink, pelican sepia drawing ink, and an assortment of brushes. I scored the fold using an exacto knife to get it to fold properly.

I hope one day my broke ass will be able to give my dad more than just a card, but for now, this will have to do.

I love you Dad! Thank you for everything!


Card cover


Card inside

Wednesday, June 3, 2009

Bartleby the Dragon

I just finished the first of what I hope will be a series of sock puppets. My hope is that I may be able to sell them at some point. I used a sock that I dyed green for the body and the features were mostly created out of fabric and poly-fil. The fins on the side of the neck have wire sandwiched between two pieces of extra thick interfacing so they are very posable. The next batch will probably use pingpong balls for eyes instead of styrofoam. Not that styrofoam is bad, but I am curious to see the difference between the two. And so without further ado, say hello to Bartleby the Dragon!


Tuesday, May 26, 2009

Website is finished..... sorta

The website is about as done as it is going to get for now. Please check it out at http://ramsites.net/~gjperez/ and let me know what you think!

Now, back to work on some puppets....

Sunday, May 24, 2009

Almost done....

I am pretty close to finishing the graphics for the homepage of the new website. Getting the textures for different areas was probably the most fun part. I'm finding that photoshop is most fun for me when I incorporate multiple sources including traditional art, texture (cloth, paper, etc), and the digital coloring.

Anywho, just as I was finishing up, a friend of mine suggested something that was right on the money. Use flash! Well unfortunately I'm an idiot and this was made with the intention of using just some basic html. For a flash rendition I would have to do some serious rearranging. This may happen in the future but now that I've gotten this far I think I'm just going to finish as is and translate it to flash at a later date.

Here it is-


Thoughts?

Tuesday, May 19, 2009

New Website

So it's been a while since I last blogged I know. Since the semester is finally finished kicking my butt, I can now pick up where I left off.... well kinda.

The truth of the matter is that Vincent is completely finished now and has already made his big debut at Saturday Art School. I WILL continue to post my haphazard tutorial in the future. I have all the pictures, I just need to slap them on here. I find one major problem with blogging, and that is, the time you spend blogging is time that you might spend doing your artwork. That being said, I know of plenty of other people who are way more productive than me that somehow manage to blog too. Sometimes you just have to sacrifice a little sleep.

Anywho.... After teaching two semesters of Technology in Art Education, my students inspired me to create a new website. Getting back into web design has reacquainted me with some of the many frustrations that go into developing a website. If any of my students are reading this I just wanted to let you know I have an overflowing abundance of respect for all of you.

Below this pic you will find the rough draft of my website. The theme is kind of carnivalish, which I found fitting with my new emphasis on puppet making and such. The top banner will be hand drawn and then probably computer colored. I'm thinking an etched look ala

Fun fact - Lot's wife got totally pwned by God. Then his two daughters got him drunk and did the nasty with him thinking they were the last humans on the earth. GROSS!

Ok so here is the mock-up for the website. It's pretty simple; the ticket areas are going to be links and the thumbnails are pics that enlarge when they are clicked.


Please let me know what you think. I could use as much feedback as possible on this one!

Thursday, April 23, 2009

Hands

While I still had access to my dad's workshop I decided to get the hands done too. I roughly followed along the AWESOME posable hand building tutorials at project puppet (www.projectpuppet.com) and the puppet 101 blog.

First I created the hand- sorry for lack of pictures on this step.

I started by using a pattern to cut the foam hands. I then set them aside.


A little jump here.... I cut the palm out of 2 ply chip board. I cut holes in the board using an exacto knife and then attach 16 gauge floral wire (Looking back I should have used thicker wire). Notice they are curled on both ends. This helps displace the pressure on the fnger tips when adjusting them later and the bottom curls attach the wire to the board.


You can see all the supplies and patterns here. You'll also notice a few new pieces in hte upper left that I created with foam and then wrapped the "skin" terry cloth around. I'll get to that later.


I'll ve using 5/32 music wire for the arm rods. These aren't easy to cut to size so we had to bring out the POWER TOOLS. Did I mention power tools ROCK!? SPARKS OMG!


Next you want to bend the end a couple of times so the angle is appropriate for the hand.


Next, using some 5 minute epoxy, I glue everything in place.

I put this aside and get to work on the grips. I'm using a half inch square dowel that are cut to two 4" peices. I drill a hole for the music wire to fit into.


Using a dremel I cut a groove into the wood. This will allow the wire to sit flush.


Using epoxy I glue the rod in place. Note I have bent it 90 degrees before hand. The rod should fit flush on the grip.


Then, using electrical tape I wrap it up.

Now back to the hands. I coat them with contact cement and sandwich them between the foam hands.


Then I finish the edges by applying some cement to the edges and pinching them. Here is the finished hand.